DIY Custom Closet – IKEA TARVA & IVAR HACK
In 2015, my husband and I bought a house that met most of our criteria, except it lacked a proper master suite. The bedroom was small, but it wasn’t the worst part. The bathroom and closet were the biggest eyesores, making us decide to come up with a renovation plan to make our dream master suite a reality. In this post, I’ll share the full process of our DIY custom closet, and I hope it inspires you to take on a similar project.
Getting Ready for the Build
Here’s a glimpse of our project on demo day. I remember feeling overwhelmed, thinking, “Oh no, there’s no turning back now!” Our old closet was on the left with the light on, and the red room in the back was the old den. We removed all the plumbing, framed a door for the den/new bathroom, and moved the closet wall to the right to make it as big as possible while still allowing a hallway.
After framing the walls and installing drywall, our closet space was finally starting to take shape. The walls were painted, and new hardwood flooring was installed, making it the perfect time to start building our custom closet.
What Not to Do
If I could go back, I would not paint the walls before covering them with wood. It was a waste of time and paint! If you plan to build a similar closet, take it from me and skip the painting step.
How to Build a Custom DIY Closet
This post contains affiliate links.
Materials Needed
- 2×4 boards (for the base)
- 3/4″ hardwood plywood for the base, sides, and shelves
- IKEA TARVA 5-Drawer Chest
- IKEA IVAR 3-Drawer Chest (discontinued, use 3-drawer TARVA instead)
- 24″x48″ craft boards (for the IVAR dresser top)
- 1×2 boards (for the face trim)
- Closet rods
- Pull handles
- Baseboards
- Quarter round
- Wood screws
- Pocket hole screws
- Brad nails
- Sand paper
- Shelf pins
- Wood filler
- Caulk
- Paint
- Primer
- Paint roller
- Paint brush
Tools Needed
- Drill
- Pocket hole jig
- Shelf pin jig
- Miter saw
- Table saw
- Oscillating tool
- Hammer
- Level
- Stud finder
- Tape measure
- Brad nailer
- Staple gun
- Speed square
- Sander
- Clamps
- Caulk gun
Materials Cost: $1,400
Before starting our project, we explored various custom closet options at Home Depot, Lowe’s, and the Container Store. However, the quality wasn’t what we were looking for. We opted for an IKEA hack using the TARVA and IVAR dressers, which ended up being more cost-effective.
Pointers for Designing a Custom Closet
Before building your closet, consider the following factors:
- Depth and height of hanging clothes
- Height of shoes
- Maximum reachable heights for hanging clothes
You can find more information on these factors in this post from HGTV.
Directions – DIY Custom Closet IKEA Hack
Step 1: Build a Base Frame
Use 2×4 boards to create a base frame with a depth equal to the width of the IKEA dresser. Add supports every 18″ and screw the frame together using wood screws.
Step 2: Add Plywood to the Base
Cut 3/4″ hardwood plywood to match the base frame’s dimensions and attach it using glue and a nail gun.
Step 3: Install the IKEA Dressers
Place the dressers on the base frame, centering them on the walls. Remove the legs and frame from the bottom of the dressers.
Step 4: Add Wall Backing
Cut 1/4″ hardwood plywood sheets to fit the walls and attach them using a staple gun.
Step 5: Build and Install Boxes for Each Section
Cut the left and right walls and top for each box, making them 1″ shallower than the IKEA dresser. Install the boxes, screwing them into the studs and attaching them to the dressers.
Step 6: Install Shelves
Use a Kreg Jig to drill pocket holes and install shelves for shoes. Fill the visible pocket holes with wood filler.
Step 7: Install Trim
Use 1×2 boards as trim to cover the unfinished plywood edges. Install baseboards and quarter round at the bottom.
Step 8: Prep for Paint
Fill any holes or imperfections with wood filler and sand the entire surface. Caulk the joints and clean the surface before painting.
Step 9: Paint the Closet
Prime the entire surface and apply at least two coats of paint.
Step 10: Install Hardware
Install pull handles and hanging rods. Cut the rods to length using an oscillating tool.
Step 11: Install Adjustable Shelves
Optional: Build shelves with 1×2 trim and use a Kreg Shelf Pin Jig to install adjustable shelves.
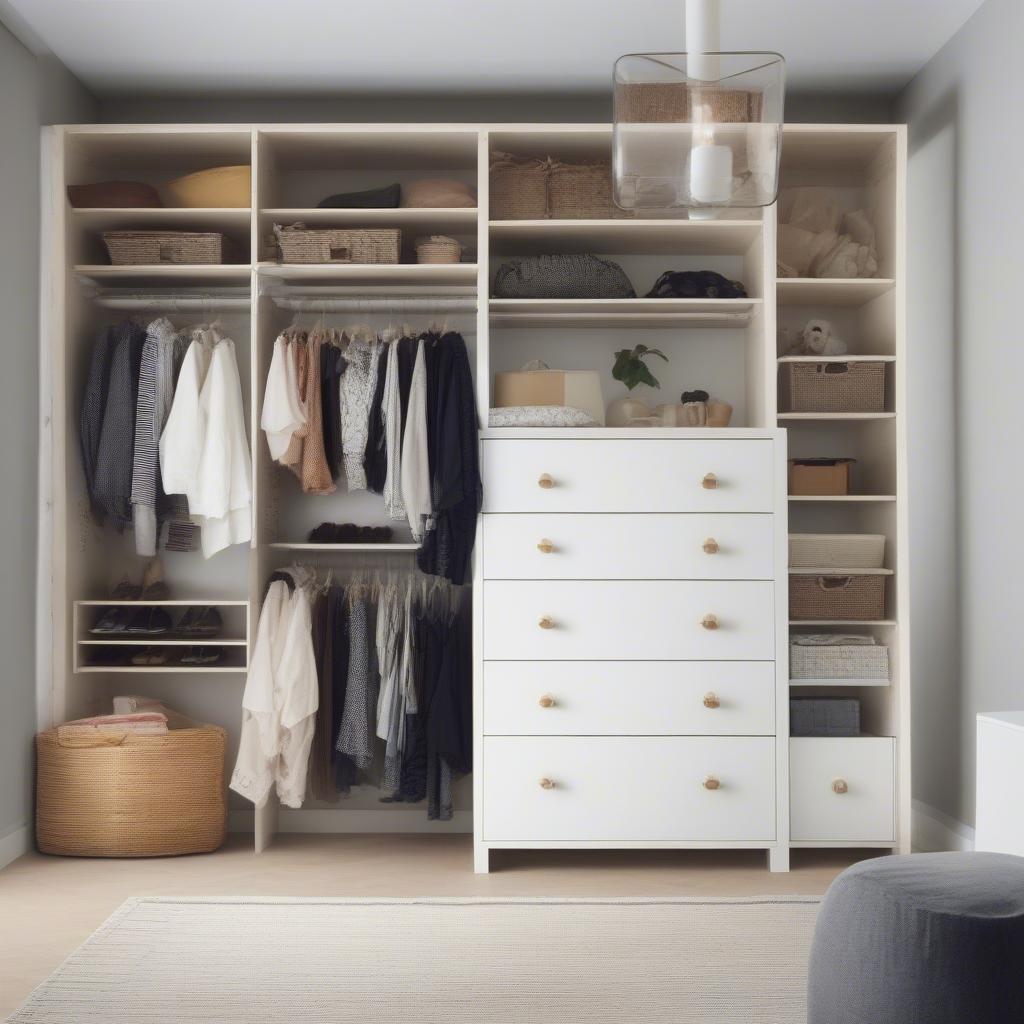
Finished Closet Pictures
Our DIY custom closet is finally complete! I’ve included pictures of the finished closet, showcasing the beautiful IKEA TARVA and IVAR dressers, shelves, and hanging rods.
Final Thoughts
Our master suite remodel was the biggest DIY/renovation project we’ve taken on, but it was worth it. I learned a lot during the process and ended up with a beautiful custom closet.
For more inspiring projects, check out my IKEA Hacks page and my full tutorial for a DIY Custom Pantry. What materials are needed for the DIY custom closet? 2×4 boards, 3/4″ hardwood plywood, IKEA TARVA 5-Drawer Chest, IKEA IVAR 3-Drawer Chest (or 3-drawer TARVA), 24″x48″ craft boards, 1×2 boards, closet rods, pull handles, baseboards, quarter round, wood screws, pocket hole screws, brad nails, sandpaper, shelf pins, wood filler, caulk, paint, primer, paint roller, paint brush.
What tools are required for this project? Drill, pocket hole jig, shelf pin jig, miter saw, table saw, oscillating tool, hammer, level, stud finder, tape measure, brad nailer, staple gun, speed square, sander, clamps, caulk gun.
How much did the materials for this project cost? $1,400
What are the pointers for designing a custom closet? Consider depth and height for hanging clothes, height for shoes, and maximum reachable heights for hanging clothes.
What are the steps to build the custom closet? Build a base frame, add plywood to the base, install IKEA dressers, add wall backing, build and install boxes, install shelves, install trim, prep for paint, paint the closet, install hardware, and optionally, install adjustable shelves.
Why should painting walls before adding wood covering be avoided? It’s a waste of time and paint.
What are the benefits of using IKEA dressers for this hack? Cost-effective and good quality.
Did you use the IVAR for this project? No, as it was discontinued, we used 3-drawer TARVA instead.
What measurements are important to note during construction? Width of the IKEA dresser for the base frame depth, and making the boxes 1″ shallower than the IKEA dresser.