“`html
The Ultimate Guide to Renter-Friendly DIY Decor: Make Your Space Home Without Losing Your Deposit
Let’s be honest: moving into a rental often feels like moving into a beige box. You’ve got the “landlord special” paint job (where even the light switches are painted over), the generic blinds that have seen better decades, and that one mysterious stain on the carpet that you’ve strategically covered with a chair. You want your home to reflect your personality, your style, and your zest for life—but you also really want that security deposit back when your lease is up.
I’ve been there. I’ve lived in everything from a tiny studio with zero natural light to a sprawling apartment with rules so strict I was afraid to even lean a mirror against the wall. But over the years, I’ve learned a secret: your rental agreement is not a death sentence for your interior design dreams. It’s actually a creative challenge.
In this guide, we are going to dive deep into the world of temporary, reversible, and high-impact DIY projects. We’re talking about transformations that will make your friends say, “Wait, you’re allowed to do this?” and your landlord say, “Wait, was it always this nice?” during the move-out inspection. From peel-and-stick wonderlands to lighting hacks that change the entire vibe, here is how you reclaim your space.
1. The Magic of Peel-and-Stick Everything
If the 2010s gave us anything, it was the revolution of adhesive technology. Gone are the days of sticky contact paper that bubbles and ruins surfaces. Today’s peel-and-stick products are high-quality, textured, and—most importantly—designed to come off cleanly.
Removable Wallpaper (The Game Changer)
If you want to make the biggest impact with the least amount of permanent change, removable wallpaper is your best friend. It’s no longer just for nurseries. You can find sophisticated grasscloth textures, bold Art Deco patterns, and even realistic brick or wood finishes.
Pro-Tip for Installation: Never try to do this alone on a Sunday night when you’re tired. It’s a two-person job. Start from the top, use a felt-edged squeegee to get the air bubbles out, and always buy 10% more than you think you need to account for pattern matching. When it’s time to move, just grab a corner, pull slowly, and watch your bland wall reappear, unscathed.
Vinyl Floor Decals and Tiles
Hate your kitchen floor? You don’t have to live with that cracked linoleum. Peel-and-stick floor tiles (often made of vinyl) can be laid directly over existing hard flooring. They are water-resistant and provide a massive aesthetic upgrade. Just make sure the original floor is incredibly clean before you start, or the adhesive won’t bond correctly. When you move out, a little heat from a hairdryer will soften the glue, allowing them to pop right up.
2. Window Treatments That Don’t Require a Drill
Rental blinds are usually the stuff of nightmares—flimsy, dust-collecting plastic slats that break if you look at them wrong. But curtains make a room feel finished and “expensive.” How do you hang them without drilling holes in the header?
Tension Rods and “No-Drill” Brackets
For lightweight sheers, a simple tension rod inside the window frame works wonders. But if you want heavy, floor-to-ceiling velvet curtains, you need something sturdier. Look for “No-Drill” curtain rod brackets. These clever devices tap into the top of the existing wooden window trim with tiny pins that leave holes smaller than a thumbtack—virtually invisible to the naked eye. Alternatively, Command makes heavy-duty curtain rod hooks that can hold a surprising amount of weight if you prep the surface with rubbing alcohol first.
Decorative Window Film
Do you have a window that looks directly into your neighbor’s living room? Instead of keeping the blinds closed forever, use static-cling window film. You can get versions that look like frosted glass, stained glass, or even a prism effect that throws rainbows across your room when the sun hits. Since it uses static cling rather than adhesive, you can peel it off in three seconds when you leave.
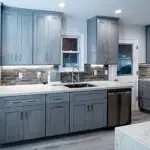
3. The Kitchen Refresh: Command Centers and Contact Paper
The kitchen is usually the hardest part of a rental to love. You can’t exactly rip out the cabinets or replace the countertops. Or can you?
Contact Paper Countertops
Hear me out: high-quality marble-print or granite-print contact paper can look shockingly real. If your countertops are stained or just plain ugly, covering them with a waterproof vinyl wrap can change your entire mood while cooking. The key is the edges. Use a hair dryer to “shrink wrap” the vinyl around the corners for a seamless look. It’s durable enough for daily use, provided you always use a cutting board!
Hardware Swaps
This is the “Oldest Trick in the Book” for a reason—it works. Most rental cabinets have the most basic, boring knobs. Buy a set of matte black, brass, or ceramic knobs that fit your style. Crucial Step: Put the original landlord-provided knobs in a Ziploc bag, label it, and hide it in the back of a cabinet. When you move, swap them back. It takes twenty minutes and makes the kitchen feel custom.
Removable Backsplashes
Peel-and-stick “Smart Tiles” are made of a 3D gel that looks and feels like real ceramic or glass tile. You can stick them right over existing tile or painted drywall. They are heat and humidity-resistant, making them perfect for that space behind the stove. It adds texture and color to a space that is usually devoid of both.
4. Lighting: Saying Goodbye to the “Boob Light”
Lighting is the soul of a room. Most rentals come with the dreaded flush-mount “boob light” or harsh fluorescent overheads. You don’t have to live in an interrogation room.
The “Magic Light Trick”
Found a beautiful hardwired sconce at a vintage store but don’t want to call an electrician (or pay for one)? Use the “Magic Light Trick.” Mount the sconce to the wall using Command strips or small nails, but don’t worry about the wires. Instead, nestle a battery-operated puck light (with a remote!) inside the light fixture where the bulb would go. Voila—ambiance without the electrical fire hazard.
Plug-In Pendants and Sconces
Search for “plug-in” versions of your favorite fixtures. Many stylish mid-century modern sconces come with long, decorative fabric cords. You just screw a small hook into the ceiling or wall, hang the light, and plug it into the nearest outlet. Use cord covers that match your wall color to keep the look clean and professional.
5. The “Gallery Wall” Without the Holes
A home without art feels like a hotel room. But if your lease says “no nails,” you might feel stuck. You aren’t. We live in the golden age of hanging technology.
Command Picture Hanging Strips
If you haven’t discovered the velcro-style Command strips, your life is about to change. They can hold heavy frames securely, and when you pull the tab, they release without taking the paint with them. Expert Tip: Always wait 24 hours after sticking the strip to the wall before you actually hang the heavy frame. Gravity is a patient enemy; don’t give it an opening.
Washi Tape Frames
For a more bohemian or casual look, especially in an office or bedroom, use Washi tape to “frame” posters or prints directly on the wall. It comes in endless colors and patterns and is designed specifically to be low-tack, meaning it won’t damage even the thinnest paper or the cheapest paint.
Lean, Don’t Hang
If you have large-scale art or mirrors, don’t worry about the wall at all. Lean them! A large floor mirror leaning against a bedroom wall makes the space feel larger and more intentional. Smaller pieces of art can be leaned on bookshelves or mantels, layered in front of each other for depth.
6. Bathroom Upgrades: Small Changes, Big Impact
Rental bathrooms are often… depressing. Between the industrial-grade grout and the low-pressure showerhead, it’s rarely a spa experience. But you can change that.
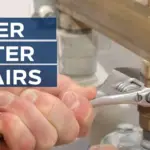
The Showerhead Swap
You are not stuck with that 1990s showerhead that barely trickles. Replacing a showerhead is as simple as using a wrench to unscrew the old one and screwing on a new, high-pressure rainfall model. (Again, keep the old one in a bag under the sink to swap back later). This is arguably the best $30 you will ever spend on your rental.
Toilet Seat Replacement
It sounds a bit strange, but a fresh, high-quality wooden or “soft-close” toilet seat can make a bathroom feel much newer and cleaner. It’s a two-minute job that makes a daily difference in your comfort.
7. The Floor: Softening the Space
Unless you’re lucky enough to have original hardwoods, you’re likely dealing with wall-to-wall beige carpet or “luxury” vinyl planks that have seen better days. The solution is layers.
Area Rugs Over Everything
Yes, you can put an area rug over carpet! It defines the space, protects the carpet from your own spills (saving your deposit), and adds a layer of soundproofing. If you’re putting a rug over a hard floor, invest in a high-quality rug pad. It prevents slipping and makes even a cheap rug feel plush and expensive.
8. Furniture Hacks for Renters
Sometimes it’s not the apartment that’s the problem, it’s the furniture we brought with us. But before you buy a whole new set, try these reversible DIYs.
Contact Paper on Furniture
That old IKEA desk seen some wear? Cover the top with wood-grain or marble-effect vinyl. It looks like a custom piece and protects the actual furniture from further damage.
Fabric Over Cupboards
If your rental has open shelving or glass-front cabinets and you don’t like seeing your mismatched mugs, use liquid starch to “wallpaper” the back of the cabinets with fabric. You can also use tension rods to hang small “cafe curtains” over open shelving units to hide clutter.
9. The Secret Weapon: Plants
If all else fails, buy a plant. Actually, buy ten. Plants bring life, color, and oxygen into a space. They hide ugly corners, draw the eye upward, and make a temporary space feel permanent and cared for. If you don’t have a green thumb, high-quality “real touch” silk plants have come a long way and require zero sunlight.
10. The Move-Out Strategy: Reversing the Magic
The key to being a successful “renter-decorator” is the exit strategy. About a month before you move, start the reversal process.
- Heat is your friend: Use a hair dryer to warm up the adhesive on wallpaper or floor tiles before pulling. It prevents the “tear” and keeps the surface smooth.
- Goo Gone: Keep a bottle of adhesive remover handy for any stubborn sticky spots.
- Spackle and Paint: If you did use a few nails, get a small tub of pre-mixed spackle. Fill the holes with your finger, wipe it flat with a damp cloth, and you’re good to go. Most landlords won’t even notice small patches.
- The Swap Back: This is when that Ziploc bag of old knobs and the old showerhead come out of hiding. Swap them back in, and take your beautiful upgrades to your next home!
Conclusion: It’s Your Home, Even if You Don’t Own It
At the end of the day, your home should be your sanctuary. We spend so much of our lives waiting—waiting for the “forever home,” waiting for the mortgage, waiting for the perfect timing. But you are living your life now. You deserve a space that inspires you, even if you’re only there for a twelve-month lease.
By using these renter-friendly DIY projects, you can bridge the gap between “temporary resident” and “interior designer.” So, go ahead—order that peel-and-stick wallpaper, swap out those knobs, and hang those curtains. Your beige box is waiting to become a masterpiece.
Happy decorating!
“`