Building DIY Kitchen Cabinets – A Complete Guide
Why I Built My DIY Cabinets Using Only Plywood
Building your own DIY kitchen cabinets seems like a pretty intimidating project. However, I found out that it’s actually an easy project to take on and it’s totally doable with just a few basic tools and some good quality plywood. I built all my DIY kitchen cabinets from plywood. I didn’t plane, join, or mill a single piece of hardwood, except for the countertop. This saved a ton of money and time.
Plywood Benefits
* Plywood is much easier on the wallet than solid hardwood.
* It saves time because you don’t have to mill all the lumber.
* You don’t need a ton of fancy tools.
What You Will Need to Build Your Own DIY Kitchen Cabinets
Materials:
* ¾” Birch PureBond Plywood (full sheets are best, but 2×8 sheets would work as well)
* ¾” Hickory 2×4 PureBond Plywood Panels
* ¼” Birch PureBond Plywood (full sheets are best, but 2×8, 2×4, or 4×4 sheets would work as well)
* 1 ¼” pocket hole screws
* Birch Edge Banding
* Hickory Edge Banding
Tools:
* Circular saw
* Kreg Rip Cut
* Kreg AccuCut
* Kreg Track Horses (optional)
* Drill
* Miter Saw
* Jig Saw
* Kreg Pocket Hole Jig
* Tape Measure
* Square
* Pencil
* Iron
Step-by-Step Instructions
Step 1: Determine and Cut Cabinet Depth
A Note About Cabinet Depth: I built these DIY cabinets frameless, with full overlay doors to avoid having to use anything except plywood to build them. That said, the total depth of my base cabinets including the door was about 24” deep and upper cabinets was about 13 ¾”. If you want to change the depth of your own cabinets, rip your plywood narrower or wider as needed.
So for my base cabinets, I ripped my full plywood sheets down to 22 ¾” strips. I saved the thin strip leftover to use later as the top supports.
For my upper cabinets, I ripped my plywood to 12 ½” wide. Once you rip 3 strips at 12 ½” wide, you have a strip about 10 ½” or so leftover. Save this for your shelves later.
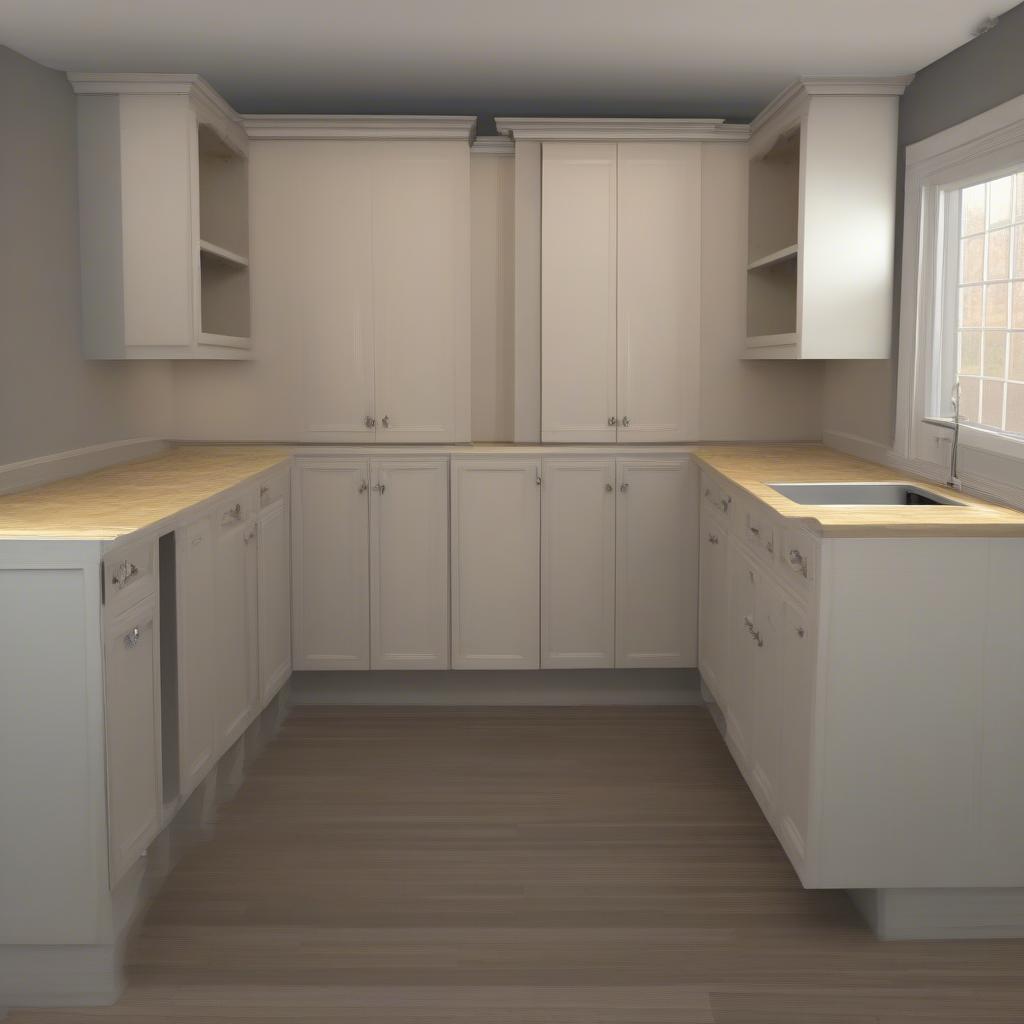
Step 2: Cut Base Kitchen Cabinet Carcass Pieces
Typical base cabinet height is about 34 ½” tall then you have a 1 ½” countertop to make it 36” total. I recommend sticking to that standard and cutting your base side panels 34 ½” long. I cut two side panels from each 22 ¾” strip from step 1.
For this, I used my Kreg AccuCut and circular saw for quick, clean cuts. See more on how to cut down plywood here.
From the remaining plywood, I cut the bottom panel. Here’s a helpful diagram:
A Note About Cabinet Width: I made my kitchen cabinets overall size 24 ¼” wide. This was so that I didn’t have to trim the width of the 24″ wide Hickory Plywood Panels for my doors. So that’s what my measurements will be based off of. However, if you want different cabinet sizes, it’s easy to modify. Simply take the overall width you want your cabinet box to be and subtract 1 ½″. That is the length you need to trim your bottom panel and top support pieces.
In my case, 24 ¼″ – 1 ½″ = 22 ¾″. I cut 3 top supports to the same length as my bottom panel (in my case, 22 ¾″ long) for each base cabinet.
Step 3: Cut Out Toe Kicks on Base Cabinets
Now before assembling, I needed to add two more details. Most kitchen cabinets have toe kicks on the base cabinets. You can go without toe kicks, but I am pretty careless and rough on things, so I would be accidentally kicking the bottom of the cabinets constantly and scuffing them up. So I added toe kicks.
To do this, I drew a line 3 ½” from the BOTTOM of EACH base cabinet (only the base, not the uppers) side panel and another line 4 ½” in from the front bottom side of the side panel. The corner where these lines meet needs to be cut out with a jig saw.
Step 4: Apply Edge Banding
The last detail before assembling the carcasses, is adding edge banding. Since these are frameless DIY kitchen cabinets, there won’t be a frame on front to cover the plywood edges. So, I applied iron on edge banding on the FRONT edges of my cabinet pieces in order to hide them. This goes on the FRONT sides of everything that will be exposed.
Step 5: Assemble the Base Kitchen Cabinet Boxes
I used ¾” pocket holes and 1 ¼″ pocket hole screws to assemble these cabinet boxes.
I drilled pocket holes along the side edges of the bottom panel and the ends of the support pieces.
I attached the bottom panel between the side panels 3 ½” from the bottom of the sides–just above the toe kick.
Then, I attached the three support strips so that one runs along the back, and two along the top-one in the front and one in the back. Make sure the one in the front is the one with the edge banding applied. That gives you your cabinet box.
Step 6: Add Backs to DIY Cabinets
Adding the backs sounds pretty simple…and it is. But it’s also a critical part of the process. Make sure when cutting your back panels, that they are square and make sure when you attach them, that your cabinet is also square to this back piece.
I cut ¼” PureBond plywood panels to fit over the back side of my cabinet boxes. Simply nail or staple in place.
Step 7: Add Doors, Drawers, Shelves to Cabinets
Cabinet Doors: Now, I made full overlay doors for most of my cabinets. I wanted the entire cabinet carcass to be hidden and basically let the doors steal the show. So to cut the doors, I measured my cabinet box and cut the hickory panels ¼” smaller on in both directions than the front of the box.
I applied hickory edge banding to all sides of the doors and sanded well.
Cabinet Drawers: Also, if you choose to install drawers instead of doors, you can install drawers.
Cabinet Shelves: Lastly, I added some shelves using shelf pins so they are adjustable. My Kreg Shelf Pin Jig came in handy for this and I cut ¾″ plywood to use as shelves for my cabinets.
Step 8: Install DIY Base Cabinets
Now, to install these cabinets, I used shims to level them up where they go, screwed them TOGETHER through the side panels, then attached them to the studs in the wall through the top back support.
Once all the base cabinets were in place, I glued up a solid hickory wood countertop (like in this post) and attached through the top supports of the cabinet boxes.
You can install whatever type of countertop you prefer.
And the final piece, was adding the toe kicks at the bottom. For the toe kicks, I ripped ¾″ plywood pieces 3 ¼″ wide and nailed into place. You’ll have to trim down the size you need to cover each section of cabinets you have put together.
Step 9: Assemble Upper Kitchen Cabinet Boxes
Now, the plywood strips have been cut for the upper cabinets in step 1. But they need to be cut to length and assembled.
Upper cabinets are a little trickier as your side panels will vary depending on if you want them to go to the ceiling, how high your ceilings are and how far off your countertop you want them to be. They’re SUPPOSED to be AT LEAST 18 inches from the countertop to the bottom of the upper cabinet.
You will have to determine what height your uppers need to be (I used 40″), but the top and bottom panel pieces should be figured and cut just like the base cabinets in step 2 based on how wide you want your cabinet box to be.
Now…I bet you’re wondering why there’s a space at the top in my diagram above. I wanted my cabinets to go all the way to the ceiling, BUT I was adding a piece of trim between the cabinet and the ceiling and needed something to nail that trim to.
So I attached my top panel 3 ½” from the top of the side panel. That way, when I hang my cabinets, I can attach the trim along the top of the cabinets and have something to nail to.
If you aren’t going to the ceiling or aren’t doing the trim, then attach your top panel flush with the top of the sides and same with the bottom.
I assembled these using ¾” pocket holes and 1 ¼” pocket hole screws like the bases.
Step 10: Install Ceiling Trim (Optional)
Depending on your own preferences and how you built your cabinets, adding this trim is optional. But, I just glued and nailed a 1×3 onto a 1×4 board and nailed this along the top as the trim.
You could do crown molding or some other type of trim, but I just kept it simple and modern.
Step 11: Finish DIY Kitchen Cabinets
You can finish the cabinets before or after installation…I painted the uppers before installing and polyed the base cabinets after.
I simply applied a few coats of Minwax Helmsman Water Based Poly on the bottom cabinets and the countertop.
And for the top cabinets I applied one coat of Kilz primer (water based), and two coats of Sherwin Williams Dorian Grey on top after it dried.
Once the finish is dry, you can add your door and drawer hardware.
I LOVE these Liberty Artesia pulls for a clean, modern look.
Conclusion
Building DIY kitchen cabinets is not difficult. All you need is a few basic tools and some good quality plywood. Follow these step-by-step instructions, and you will have your own custom kitchen cabinets in no time.
Remember, the key to building successful DIY projects is to take your time, measure carefully, and have fun. Happy building!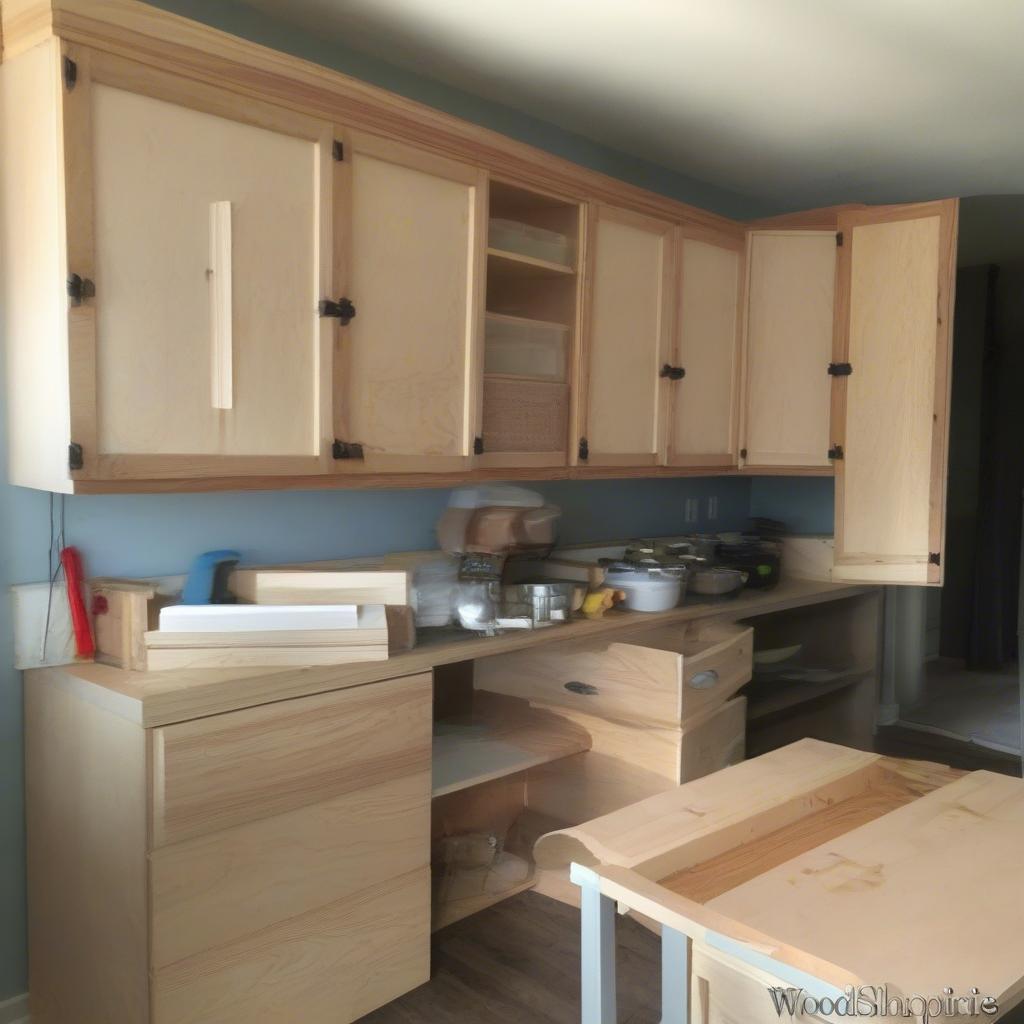 Why did you use plywood instead of hardwood for your kitchen cabinets?
*Plywood is much easier on the wallet, saves time, and doesn’t require a ton of fancy tools.*
What materials do you need to build DIY kitchen cabinets?
*¾” Birch PureBond Plywood, ¾” Hickory 2×4 PureBond Plywood Panels, ¼” Birch PureBond Plywood, 1 ¼” pocket hole screws, Birch Edge Banding, and Hickory Edge Banding.*
What tools are required for building DIY kitchen cabinets?
*Circular saw, Kreg Rip Cut, Kreg AccuCut, Kreg Track Horses, Drill, Miter Saw, Jig Saw, Kreg Pocket Hole Jig, Tape Measure, Square, Pencil, Iron.*
What is the depth of the base and upper cabinets you built?
*Base cabinets: about 24” deep; Upper cabinets: about 13 ¾” deep.*
What is a critical step in adding backs to the cabinets?
*Ensure back panels are square and your cabinet is square to the back piece.*
How did you attach the base cabinets to the wall?
*Used shims to level them, screwed them together through the side panels, then attached through the top back supports to the wall.*
What is the purpose of adding toe kicks to base cabinets?
*To prevent accidentally kicking the bottom of the cabinets and scuffing them up.*
How did you finish the DIY kitchen cabinets?What is the benefit of using pocket holes in cabinet assembly?
*Pocket holes create strong joints and are relatively simple to make.*