“`html
The Ultimate Guide to DIY Vintage-Inspired Wall Frames: A Professional Thrift Flip Tutorial
Have you ever walked through a high-end home boutique or scrolled through a luxury interior design magazine and found yourself salivating over those ornate, antique gold frames? You know the ones—the heavy, textured, “I found this in a Parisian manor” frames that somehow cost $400 for a 5×7 print. If you’re like me, your heart says “yes,” but your bank account says “absolutely not.”
But here is a secret that the high-end designers don’t want you to know: those stunning vintage pieces aren’t always heirlooms. Often, they are just cheap, discarded frames that someone with a little bit of vision and a can of gold wax brought back to life. Today, I am going to teach you exactly how to do that. We are diving deep into the world of Vintage-Inspired Wall Frame Thrift Flips.
In this massive guide, we aren’t just going to slap some paint on a frame. We are going to talk about the textures, the history of gilding, how to source the best “ugly” frames, and the secret techniques to making plastic look like heavy plaster and wood. By the end of this tutorial, you will be able to curate a gallery wall that looks like it cost a fortune, all for the price of a few thrift store finds and a latte.
Why Thrift Flip Your Frames?
Before we pick up a paintbrush, let’s talk about the why. Beyond just saving money, thrifting and flipping frames is one of the most sustainable ways to decorate your home. Every year, millions of perfectly good frames end up in landfills simply because they are a dated color or have a tacky 1990s print inside them.
When you thrift flip, you are:
- Reducing Waste: Giving new life to discarded materials.
- Customizing Your Space: You aren’t limited to what’s “on-trend” at Target. You can create pieces that match your specific color palette.
- Developing a Skill: Learning how to distress, paint, and wax is a gateway to larger furniture flips.
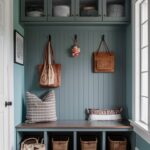
- Adding Character: Modern frames are often sleek but soul-less. Vintage frames have “bones”—the curves, the scrolls, and the imperfections that make a house feel like a home.
Phase 1: The Hunt – How to Source the Perfect Frames
Not every frame at the thrift store is worth your time. To get that high-end vintage look, you need to know what to look for. When I walk into a Goodwill or a local charity shop, I head straight to the back wall where they keep the “wall art.” Here is my checklist for a successful hunt:
1. Look for Texture, Not Color
Ignore the color. If it’s a hideous neon green or a dated 80s oak finish, it doesn’t matter. What you are looking for is molding. Look for raised scrolls, floral patterns, or beaded edges. The more “nooks and crannies” a frame has, the better it will look once we start the aging process.
2. Check the Material
Ideally, you want solid wood or plaster. However, don’t sleep on heavy-duty plastic (resin) frames. High-quality resin frames from the 70s and 80s often have incredible detail that mimics carved wood perfectly. Once painted, you won’t be able to tell the difference.
3. Size and Scale
For a gallery wall, you want variety. Look for one “hero” piece (large and ornate) and several smaller, supporting frames. Don’t worry if the frames don’t have glass. You can always use them for “open frame” decor or buy a cheap piece of glass later.
4. The “Ick” Factor
Check for structural integrity. A little bit of chipping in the plaster is actually great for a “shabby chic” or “authentic antique” look, but if the wood is rotting or infested with pests, leave it behind.
Phase 2: Gathering Your Supplies
To achieve a professional-grade finish, you need more than just a bottle of craft paint. Here is my “Expert Flip” kit list:
- The Frames: Your thrifted finds.
- Cleaning Supplies: Dish soap, water, and an old toothbrush (essential for getting dust out of crevices).
- Sandpaper: 120 grit and 220 grit.
- Primer: A high-quality spray primer (I recommend Zinsser Bulls Eye 1-2-3 or a basic grey sandable primer).
- Base Coat: Chalk paint is my favorite for frames because it sticks to everything and has a matte finish that looks old-world. Black, dark brown, or a deep navy make excellent base colors for gold.
- Metallic Finishes: Rub ‘n Buff (Antique Gold or European Gold) is the holy grail of thrift flipping. Alternatively, metallic acrylic paint or gold leaf kits.
- Dark Wax or Glaze: This is the secret ingredient that makes things look “vintage” rather than “spray-painted.”
- Brushes: A few cheap chip brushes and one soft-bristle detail brush.
- Sealant: A matte clear spray or a furniture wax to protect your hard work.
Expert Tip: If you are going for an authentic gold leaf look, Rub ‘n Buff is better than any spray paint. Spray paint often looks “flat” and “plastic-y,” while wax-based metallics have real metal pigments that catch the light like a true antique.
Phase 3: Preparation – The Foundation of a Great Flip
You’re excited to paint, I get it. But if you skip the prep, your paint will peel off in six months. Let’s do this the right way.
Step 1: Deep Clean
Thrift store frames are notoriously greasy and dusty. Take the glass and the backing out. Use a damp cloth with a little dish soap to wipe the frame down. Use that old toothbrush to scrub inside the ornate details. If the frame is particularly greasy, use a bit of TSP (Trisodium Phosphate) or a degreaser. Rinse with a damp cloth and let it dry completely.
Step 2: Minor Repairs
If there are huge chunks of plaster missing that you don’t want, use some wood filler or DAP spackle to fill the gaps. Once dry, sand it smooth. Personally, I like a few chips—it adds to the “found in a cellar” aesthetic.
Step 3: Scuff Sanding
If your frame has a very shiny, high-gloss finish, the paint won’t want to stick. Take your 220-grit sandpaper and lightly rub the surface. You aren’t trying to remove the finish, just “scuff” it so the primer has something to grip onto.
Phase 4: The Transformation – Step-by-Step Tutorial
Now for the fun part. We are going to transform that dated frame into a masterpiece. I’m going to walk you through the “Layered Antique Gold” method, which is the most popular and versatile look.
Step 1: Priming
Lay your frames out on a drop cloth in a well-ventilated area. Apply two thin coats of primer. Why thin coats? Because heavy coats will “fill in” the beautiful details of the carving, making the frame look soft and muddy. Let the primer dry for at least an hour.
Step 2: The Dark Base Coat
Why paint it dark if we want it gold? Because in real antiques, the “bole” (the layer under the gold leaf) was often red or black. When the gold wears away over time, the dark color peeks through, creating depth. Paint the entire frame in a matte black or dark chocolate brown chalk paint. Ensure you get into every single crevice.
Step 3: The “Magic” – Applying the Metallic
Once your base coat is bone dry, it’s time for the Rub ‘n Buff. Squeeze a tiny, pea-sized amount onto your finger (wear a glove if you have sensitive skin) or a soft cloth. Lightly “buff” it onto the raised surfaces of the frame.
Do not try to cover the whole frame in one go. The goal is to let some of that dark base coat stay in the deep recesses. This creates an automatic shadow effect that makes the details pop. This is what separates a “DIY project” from a “professional restoration.”
Step 4: Distressing for Authenticity
If the gold looks too “new” and shiny, take a very fine-grit sandpaper or a damp cloth and gently rub away the gold on the corners and high points. This simulates 100 years of handling and cleaning. You want it to look like the gold has naturally worn down over decades.
Step 5: Adding the Patina (The Dark Wax)
To give it that “museum grimy” look (in the best way possible), take a bit of dark furniture wax or a watered-down brown acrylic paint. Brush it over the frame, then immediately wipe it off with a clean rag. The dark pigment will stay in the cracks, highlighting the texture and toning down the brightness of the gold.
Phase 5: Alternative Finishes
Not a fan of gold? Here are three other vintage-inspired finishes you can try using the same frames:
1. The “Swedish Gustavian” Look (Chalky White/Grey)
Paint the frame in a soft, cool grey. Once dry, dry-brush a layer of white chalk paint over the top. Sand the edges heavily to reveal the wood underneath. This is perfect for a coastal or farmhouse aesthetic.
2. The “Dark Academia” Moody Wood
If you have a light-colored wood frame, use a gel stain in “Walnut” or “Espresso.” Gel stain sits on top of the finish rather than soaking in, allowing you to darken the wood without stripping it. It creates a rich, scholarly look perfect for botanical prints.
3. The Verdigris (Aged Copper)
Paint the frame a copper color. While it’s still slightly tacky, dab on a mixture of seafoam green and light blue paint using a sea sponge. This mimics the natural oxidation of copper found on old statues and garden gates.
Phase 6: What Goes Inside? Sourcing Vintage Art
A frame is only half the battle. To complete the look, you need art that matches the soul of the frame. Here are my favorite ways to get “vintage” art for free or very cheap:
- Public Domain Archives: Websites like the Metropolitan Museum of Art or the New York Public Library have thousands of high-resolution images that are free to download and print. Look for 18th-century landscapes, sketches, or botanical illustrations.
- Old Books: Find an old, damaged encyclopedia or botanical book at the thrift store. Carefully cut out the illustrations. The paper will already have a natural yellowing that looks incredible.
- Fabric Scraps: A piece of vintage lace, a scrap of velvet, or a swatch of William Morris wallpaper can look stunning when framed.
- Pressed Flowers: Go to your backyard, press some ferns or wildflowers in a heavy book for two weeks, and mount them on some linen paper. It’s timeless and costs $0.
Phase 7: Curating and Hanging Your Gallery Wall
You’ve finished your frames, you’ve picked your art—now how do you hang them without making your wall look like a cluttered mess? There is a science to the “perfectly imperfect” gallery wall.
1. The Floor Layout
Never start by hammering nails into the wall. Lay all your frames out on the floor in front of the wall you want to decorate. Move them around like a puzzle until the weight feels balanced.
2. The “Anchor” Piece
Start with your largest, most ornate frame. Place it slightly off-center. Build the rest of the collection around it. This prevents the wall from looking too symmetrical and stiff.
3. Consistent Spacing
You don’t need a ruler to make sure every frame is exactly 2 inches apart—in fact, varying the distance slightly makes it look more “collected over time.” However, try to keep the general “gap” between frames somewhat consistent (usually 2-3 inches).
4. Mixing Textures
Don’t make all the frames gold. Mix in one or two raw wood frames or a black frame to ground the look. This adds visual interest and prevents the “set” from looking like you bought it all at once from a big-box store.
Common Mistakes to Avoid
Even experts mess up sometimes. Here is how to avoid the most common “thrift flip” fails:
- Over-Distressing: If you sand too much, it looks intentional and “fake.” Less is more. Focus on the corners where natural wear would occur.
- Forgetting the Backing: If the back of the frame is visible (like on a tabletop), don’t leave it messy with paint drips. Tape it off or give it a quick coat of black paint for a professional finish.
- Using Glossy Paint: Vintage items are rarely high-gloss. Glossy paint shows every imperfection and can look cheap. Always opt for matte, eggshell, or chalk finishes.
- Inconsistent Lighting: Gold paint looks different under LED bulbs than it does in natural sunlight. Check your color in the room where it will actually hang before you commit to the final wax layer.
Advanced Technique: Creating “Faux” Plaster Texture
If you found a flat, boring wooden frame but you want it to look like a heavy, ornate Italian antique, you can use embossing paste or hot glue. Use a stencil to apply embossing paste to the corners of the frame. Once it dries, it becomes hard and textured. When you paint over it using the “Antique Gold” method described above, it will look like expensive hand-carved molding.
Maintenance and Care
Once your frames are hanging, they require very little care. Because you’ve used wax and high-quality paint, a simple dusting with a soft microfiber cloth is all they need. Avoid using harsh chemical cleaners (like Windex) on the painted parts of the frame, as the ammonia can break down the wax finish. For the glass, spray the cleaner onto a cloth first, then wipe, so no liquid drips down into the frame’s molding.
Conclusion: The Joy of the Flip
There is something incredibly satisfying about taking a “hidden gem” from a dusty thrift store shelf and turning it into a focal point of your home. It’s a reminder that beauty doesn’t always come from a price tag; it comes from creativity, patience, and a little bit of gold wax.
I want to encourage you to head to your local thrift store this weekend. Don’t look at the ugly floral prints or the scratched-up wood. Look for the shapes. Look for the potential. With these techniques in your back pocket, you are no longer just a shopper—you are a curator of your own beautiful, vintage-inspired world.
Happy flipping, everyone! I can’t wait to see what you create. Tag me in your photos or drop a comment below if you have any questions about the process. Now go get your hands dirty!
“`