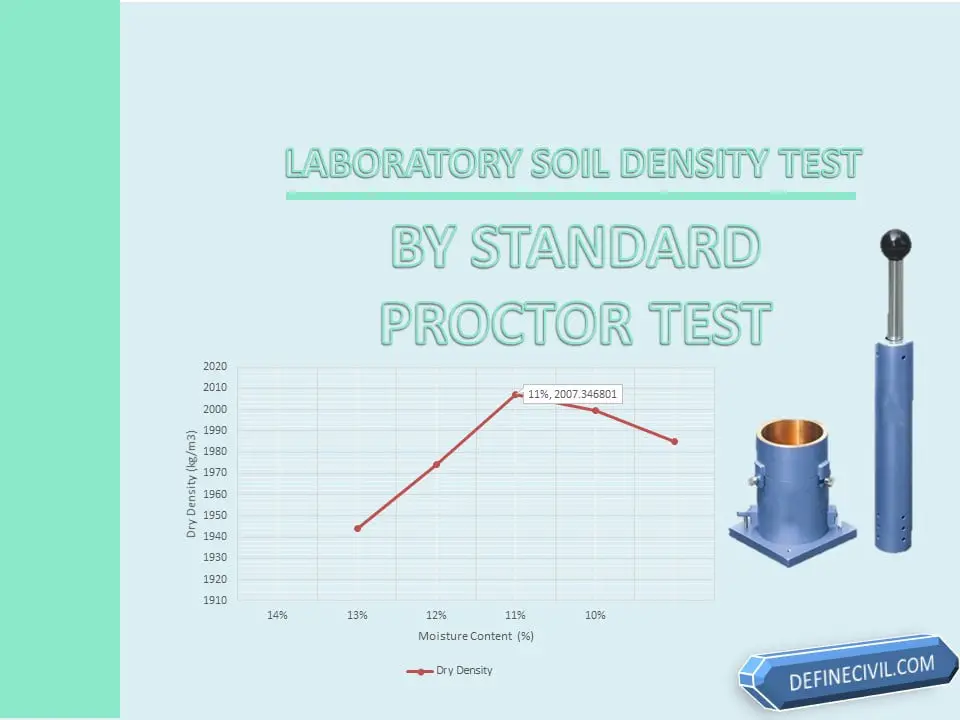
Maximum dry Density of soil is determined in the laboratory with the help of Standard Proctor Test standardized by ASTM D698 and AASHTO T99.
So this read explains in depth, the significance, background, apparatus and procedure of the standard proctor test.
Basics of Soil Compaction
It is worth mentioning, that densification or compaction of soil at site is generally carried out with the help of roller compactors.
The improvement and enhancement of soil by compaction is mandatory in building, highway and airport runways projects. The bearing strength of the soil and thereby shear resistance lies heavily on its compaction. It decreases the permeability and prevents settlement of the soil. It reduces the void ratio and thus the damage from frost could be perverted or heaving whatever.
For granular and coarser soils, vibratory rollers mostly steel drum rollers are used while pneumatic tired rollers are used for aggregates of asphaltic concrete.
For clayey / cohesive soils, sheep foot rollers are used for producing a kneading effect resulting in compaction and densification.
We know a soil matrix has three basic components:
- Solid part
- Voids filled with water
- Voids filled with air
These soil solids are arranged in a way that voids or capillaries are produced within it. The objective of compaction and densification is to re-organize soil matrix in a way that less voids are there reducing the volume of the soil and thereby increasing the overall density.
The method of compaction described above i.e. with rollers is termed as mechanical compaction or mechanical stabilization. It can be static or vibrating one depending on the type of stress applied.
[su_box title=”DID YOU KNOW?” box_color=”#4be97f”] What is the difference between compaction and consolidation of soil? Compaction is actually a broader term and is carried out with the help of rollers or compactors. In compaction the soil solids are rearranged in a denser arrangement eliminating the voids and air in it. In consolidation, the soil is compressed thereby expelling the water from the voids. In compaction, the water is added in appropriate proportion which increases the density.[/su_box]
Why to Perform Standard Proctor Test?
In order to evaluate the degree of compaction achieved at site, the field density carried out by field density test sand replacement method or any other method, is compared with the laboratory density determined by standard proctor test or modified proctor test.
Standard proctor test or proctor compaction test was the original test devised by an American engineer Ralph R. Proctor showing that for a given compaction effort, the density of soil depends on the type of soil and moisture content.
We know that the conditions of site and that of the laboratory are different altogether. The lab provides an enclosed and controlled environment where soil is compacted manually in small quantity. Whereas, in field the soil is compacted in bulk and there are some many other factors that dive in creating a unique and uncertain situation.
Factors Effecting Soil Density
According to R. R. Proctor the compaction of soils depends on following factors: –
-
Type of Soil
As I have explained above that the method of compaction for gravely soil is different than that of cohesive soils. In clayey soils, the strength of soil is mainly because of adhesion of soil solids while in gravely soils the strength is due to friction between soil solids. In composite well graded soils, both the factors affect the compaction degree.
So it is without a doubt that the nature of soil including its grading, plasticity would be dictating the degree of compaction.
-
Moisture Content
For a given type of soil and keeping compaction effort fixed, the density of soil increases with moisture content until a limiting value. This limiting value of moisture content is termed as optimum moisture content.
Water, when added to the soil matrix lubricates the soil solids thereby easing their rearrangement and restructuring. So after addition of water, when soil is compacted, the soil particles are easily re-arranged and a denser arrangement is formed.
If the water is added beyond optimum water content, it starts replacing the soil solids thereby reducing the density.
-
Compaction Effort
Compaction effort means the type of method used for soil compaction. It includes, the number of passes, type of stresses i.e. static, vibratory or dynamic and weight of the roller.
As stated in this research, the compaction and the average relative breakage of the soil mixture has a non-liner relation with increase of compaction effort. However, the compaction effort does not have any significant effect on the value of optimum moisture content.
Now that I have explained the basics of soil compaction and background of the standard proctor test, so let’s move on to the procedure.
Standard Proctor Test and Optimum Moisture Content
Standard proctor test is carried out to
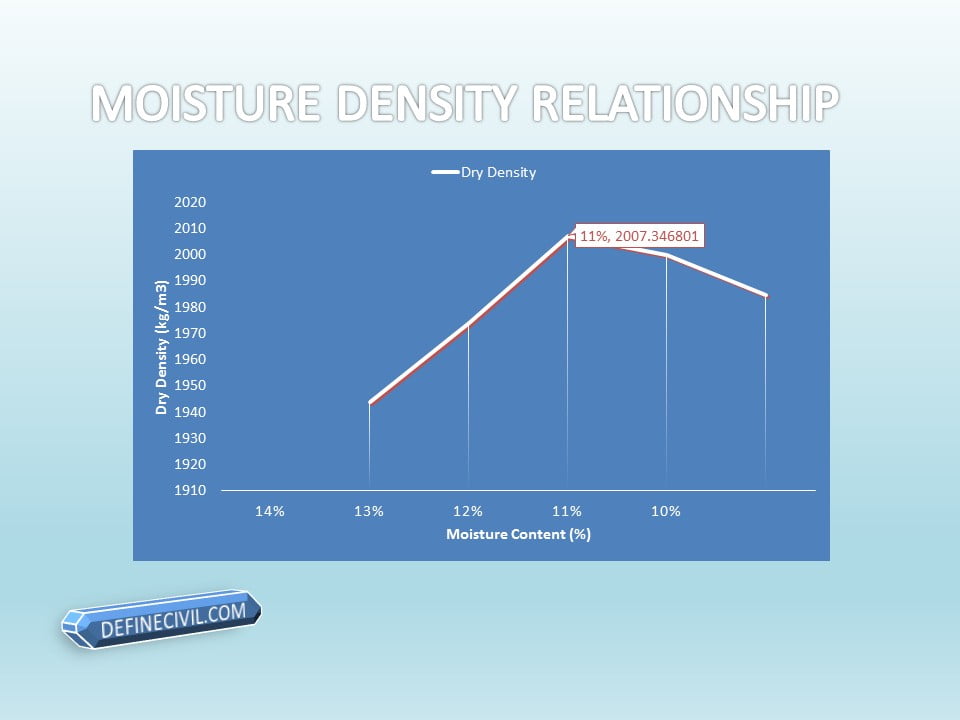
- Determine the relationship graph between moisture content and dry density
- Determine the maximum dry density of soil that must be achieved in the field.
- Determine the optimum moisture content of the soil
- Establish a moisture range that can ensure minimum compaction effort for achieving the desired density.
The one-liner of the test is, that soil is mixed with increased moisture content and with the help of proctor apparatus the weight of soil and thus density, in standard cylinder of known volume, is determined.
Apparatus for Standard Proctor Test
- Compaction Molds to hold Soil Sample
- Trowel or Rubber Mallet
- Rammer or Compactor
- Straight Edge
- A tray for soil mixing
- Drying Oven
- Sieve No. 4
- Moisture Cans
- Weighing balance that has 1 gram readability
The standard compaction mold used is a metal cylinder with detachable base plate and a collar of 2 inches thickness. The height of mold is 4.585 inches. Two sizes of molds are used either of 4 inches internal diameter or 6 inches.
Standard compacting rammer of 5.5 lbs weight is used such that having a height-of-fall of about 12 inches.
Standard Proctor Test Procedure
- Four to five representative samples of soils are obtained each about 2.3 kg to 5.9 kg. The sample must be obtained cautiously and the amount must be enough to suffice the requirements of 4 to 5 repetition while filling the molds as well as the containers for the moisture content determination.
- The soil samples are pulverized and tilled with a pulverizing tool and a mallet. The lumps are broken apart and is dried in air.
- After preparatory works, sieve the soil sample from a U.S sieve No. 4 to obtain fine particles and remove coarser proportion. The obtained finer fraction should be more than 3 kg or more. Spread the sample in a flat pan uniformly.
- Add water in the sample by sprinkling with a water bottle uniformly. For initial trail 5% water is enough. Mix the soil sample thoroughly by rubbing it in your hand palm portion by portion.
- Attach the base plate with the proctor mold and weigh it on the physical balance and note the reading as W1. The diameter and height should be precisely noted for calculating the volume of the mold.
- Attach the extension collar on the top of the mold and start filling the soil sample in the mold.
- The soil must be poured in three equal layers with each layer compacted uniformly by standard proctor hammer. The handle of the hammer is raised to preset height of fall and is then allowed to fall freely for the blow. For 4 inches diameter mold 25 blows are required while for 6 inches diameter mold 56 blows are required.
- Fill the gaps and voids on top of the sample by surcharge material and remove the collar of the sample mold carefully.
- Using the straight edge, remove the excess soil to have a sharp and flush soil surface with that of the mold.
- Weigh the compacted soil along with that of proctor mold and base plate and note it as W2.
- Extract and remove the sample after removing the base plate for the next trial. A sample extruder might be used for this.
- Fill the moisture cans from the same soil and determine the moisture content.
- The weight of the soil sample is then divided by the standard volume of the mold for determination of wet or bulk density.
- By using the moisture content, the dry density can be calculated.
- Repeat the procedure for 4-10 times depending on your experience and accurate guessing till you find a decreased weight of the soil sample indicating a clear reduction in density of the soil sample.
[su_box title=”IMPORTANT” box_color=”#4be97f”]You can add 4% initial water content for the coarse-grained soil and for fine grained soil you can take 10% moisture content as initial water content.[/su_box]
Calculation and Plotting
W1 = weight of the empty standard proctor mold + base plate
W2 = weight of the standard proctor mold + base plate filled with compacted soil sample
W3 = weight of the compacted moist soil only = W2 – W1
Dm = diameter of the mold
Hm = height of the mold
Vm = volume of the mold = (πDm2/4 ) x Hm
ϒb = bulk density of soil sample = W3 / Vm
m = moisture content of the soil sample
ϒd = (ϒb) / (1 + m)
Repeat the above calculation to determine the dry density for number of moisture contents at least 3 to 4 times so that the graph can be plotted.
Take moisture content on abscissa and dry density on ordinate, plot the points on a graph as a curvilinear relationship. Match the plotting points with a free hand curve and determine the optimum moisture content corresponding with that of the maximum dry density.
[su_table responsive=”yes”]
|
No. of Sample |
Nos. |
1 |
2 |
3 |
4 |
5 |
|
Volume of Mold |
m3 |
0.00094 |
0.00094 |
0.00094 |
0.00094 |
0.00094 |
|
Weight of Hammer |
kg |
2.5 |
2.5 |
2.5 |
2.5 |
2.5 |
|
No. of blows per layer |
Nos. |
25 |
25 |
25 |
25 |
25 |
|
No. of Layers |
Nos. |
3 |
3 |
3 |
3 |
3 |
|
Dia of Cone |
cm |
|
|
|
|
|
|
Weight of Empty Mold + Base Plate W1 |
kg |
1.368 |
1.368 |
1.368 |
1.368 |
1.368 |
|
Weight of Soil Sample + Mold = W2 |
kg |
3.467 |
3.482 |
3.497 |
3.462 |
3.436 |
|
Weight of Soil Sample only = W3 |
kg |
2.099 |
2.114 |
2.129 |
2.094 |
2.068 |
|
Bulk Density of the Soil Sample = ϒb |
kg/m3 |
2222.057 |
2237.936 |
2253.815 |
2216.764 |
2189.239 |
|
Weight of Tin |
gm |
29.31 |
29.44 |
29.5 |
29.43 |
29.38 |
|
weight of tin + wet soil |
gm |
156.64 |
152.65 |
130.18 |
159.88 |
132.71 |
|
weight of tin + dry soil |
gm |
140.71 |
138.12 |
119.17 |
147.11 |
123.06 |
|
weight of water content |
gm |
15.93 |
14.53 |
11.01 |
12.77 |
9.65 |
|
moisture contet |
% |
14% |
13% |
12% |
11% |
10% |
|
Dry Density |
kg/m3 |
1944.060 |
1974.019 |
2007.346 |
1999.760 |
1984.786 |
[/su_table]
Results
Show the graph and write down the values of Optimum Moisture Content (OMC) and along with that note down the maximum dry density (MDD).
Wait! Its Not yet Over
Yes Dear, Its not yet over. Because I have made a ready to use excel sheet for you to just put in values of standard proctor test and it will automatically calculate the optimum moisture content and the maximum dry density along with plotting of graph. You can download this excel file for standard proctor test by clicking the button below.
[su_document url=”https://definecivil.com/wp-content/uploads/2019/01/standard-proctor-test-calcuation-report-excel.xlsx” width=”440″ height=”440″]
[su_button url=”https://definecivil.com/wp-content/uploads/2019/01/standard-proctor-test-calcuation-report-excel.xlsx” target=”blank” style=”bubbles” size=”7″ icon=”icon: arrow-down”]Download the Excel Spread sheet[/su_button]
Finding Difficulty in Plotting Graph on Excel?
If ever you have finding difficulty in plotting the curve between Dry Density and Moisture Content than this explainer video is for you. Watch and learn.
[su_youtube url=”https://www.youtube.com/watch?v=LUFi_2Yw9A0″ width=”460″ autoplay=”yes”]