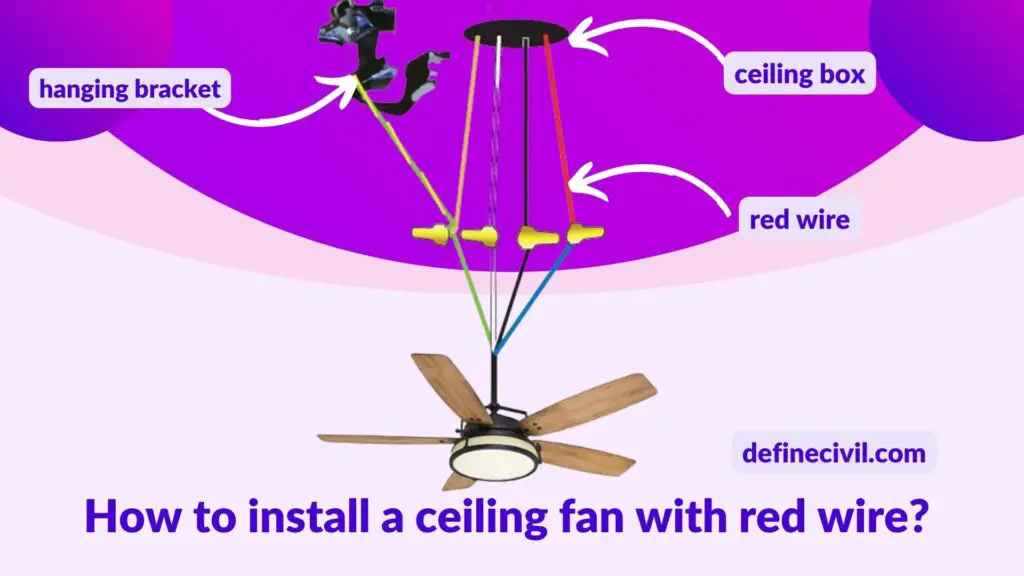
Red wires are usually used as secondary hot wires which are clearly marked to avoid the dangers of electrocution (injury by electric shock). The wiring between the switch and fan unit needs a fourth wire – a red wire to carry power to light kit. If you have same wire for light and fan than you do not have to worry because red wire makes the connection of light and fan separately.
What is a red wire?
Red wire cannot be connected to another red or black wire. It is mostly used as a switch leg and these wires are hot wires common in a 240-volt outlet. Red wires are used when installing ceiling fans, and maybe used where a light switch is to be installed.
Just remember that, at any point, if you become confused, overwhelmed, or just need help, you can always enlist the aid of a residential or commercial electrician to take over or at least point you in the right direction.
Also Read: How wide is a 55 inch TV? – Here’s your TV Dimension Guide
The Process of Installing a Ceiling Fan with a Red Wire
Depending on how the wiring was set up during the construction phase you can encounter ceiling fans with different wiring.
Because of these factors the goal is to demonstrate what you can do if a red wire appears during installation.
You can correctly connect your ceiling fan and utilize all of its capabilities without running into any problem.
Finding out whether your fan needs one or two circuits is the first step (power and lightening).
Firstly, you have to verify that the circuit has all necessary wires (black, white and neutral), and then reduce the current.

After that, you must be aware of the wire colors that are visible in the wiring placed under the ceiling. Check to see if you have a black wire or white wire.
While the white wire is neutral, the black wire is active. The ground wire is visible if there is another wire. Now you will be able to see the black and white wires together with another wire of any color (often green) that forms the circuits ground, but you also discover a red wire.
The purpose of this wire is to pass direct electricity through the switch. Therefore, the purpose of wiring your fan with a red wire is to enable proper activation of both the fan and lightening features.
You need to perform the following to accomplish this. If so, move on to the following action. If not, you must make sure the red wire is present in order to turn on all of your ceiling features.
To prevent any mishap check for continuity with a voltage tester. To determine continuity, the current must be observed. The tester will indicate that this is right. To begin installing the ceiling fan, divide the wires.
Keep in mind that the fan operating circuit is connected to the red wire. The fan lights are on the black cable.
The black wire from the fan needs to be connected to the red wire from the ceiling wiring in order to be centrifuged such that it may be controlled by a switch.
Take the live wire and the black wire; connect them, and knot them together in clockwise direction.
For the other black wire, connect it with the live wire that powers the light by taking it. Now, connect the fan box to the ceilings electrical wiring. Connecting everything to the switch circuit is now necessary.
The switch circuit will be fed by a few cut black wires. The fan circuit is wired with one wire, while the fan’s electrical supply is wired with the other.
Connect the ground wires where they need to be last one to the switch and other to the fan in the ceiling socket. Once everything is secured with screws, perform the necessary tests to complete and restart the power.
Also Read: How Much Electricity Does a Mini Fridge Uses?
How to Install a Ceiling Fan with Black, White, and Green Wires
Before installing a ceiling fan with these above mentioned wires, first of all turn on the light.
Now remove the fan blades and clean the motor. If we want to know how the fan is made, there are some screws that are visible near the ceiling.
After this remove the canopy. Before spraying the canopy of an outdoor fan or light before replacing it you have to see that no wasps or insects are present.
To ensure J shape wires can be easily disconnected and hook will be left. If you want to wire a light and fan on different switches you must have red wire. After this attach your mounting bracket to the wall with the included screws.
For installing a ceiling fan you must follow the manufacturer’s instructions. At the end of the process the blades are installed. This is helpful for hanging the fan from the suspension ball as directed.
You have to nut the white motor wire and white ceiling wire together before hanging your ceiling fan. You may either use the blue light cable or the black drive motor cable if you don’t have red wire, but if you have a red wire, connect the light blue wire to the roof’s red wire and the black motor wire to the roof’s hot black wire. Your wires remain safe if you have black electrical tape and wiring nut.
To secure canopy to the box follow the instructions of manufacturer. For adding another light remove the fan’s canopy and expose a blue and white wire. Simply you have to connect the lights black wire to the motors blue wire and the lights white wire to the motors white wire.
Also Read: Grounding grates: why they’re important at construction site? – EPZ Grates
How to Connect the Wires
Strip the end of the wires
- First step is to remove the plastic caps from the end of cables and copper must be revealed.
- Use a ladder to reach the wire in the ceiling, using wire cutter, after cutting remove them to expose the copper wire, repeat the same on the fan wires.
Connect the White Wires
- Connect the wire coming from the top end of fan to the wire coming out of ceiling.
- Now twist the ends of cables and connect the neutral wires to complete the process of fan circuit.
Connect the Two Green Wires
Now connect the green wire and join the copper terminals. After this connect the black wire to blue wire on the fan and because of this step you control both the light and fan from a single switch. Like previous case join the copper terminals of both wires.
After this connect the two green wires to the yellow and green wire that is coming out of ceiling. Now twist the phase wires, replace the plastic caps at the end of wiring, bend the connected wires inward from the ceiling bracket.
Now screw the fan cover to the bracket, and re-establish power from the fuse box and test the fan. If fan does not work out then check the connection or the wires that you have properly attach them or not.